Video demonstration
Step by step instructions
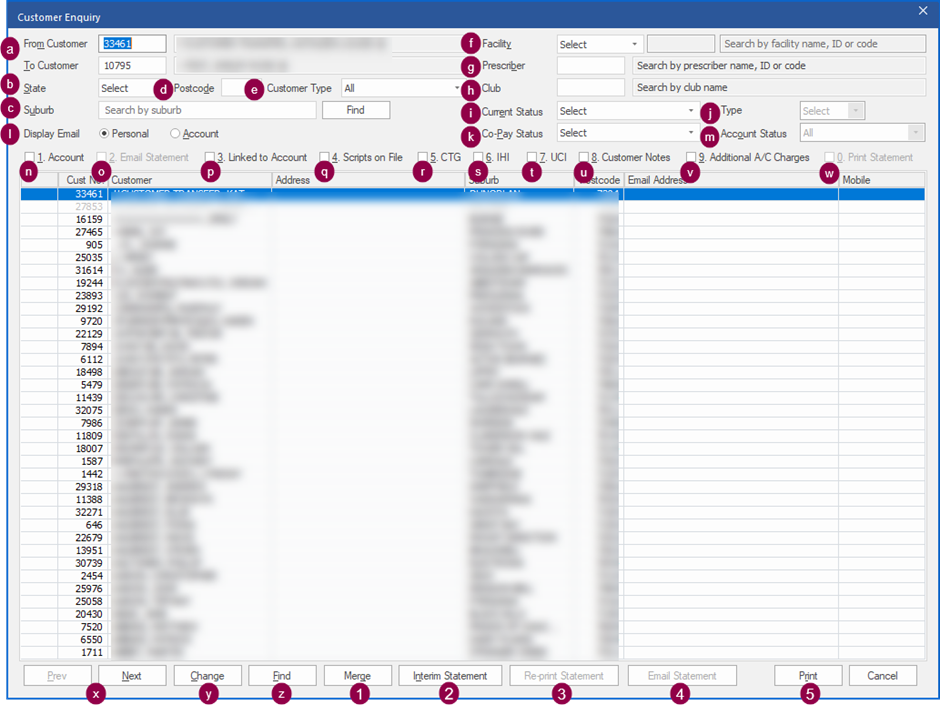
The Customer Enquiry window allows you to filter your customer database based on defined criteria. For example, the screen can display the customers who are currently keeping scripts on file at your pharmacy.
Key features include:
- Filter your customers into manageable lists using a range of search criteria
- Double click on a customer to quickly access the Customer Editing screen, or click Change
- Quickly reset filters by pressing [F2], returning to the default list displaying all customers
- Easily export a filtered list as an Excel or PDF file using Print
The list is dynamically refreshed each time you [Tab] out of a filtering option. There is no need to refresh or click in and out of fields to generate the list.
Access the Customer Enquiry window
From the Customer Management module:
1. Click the Enquire menu and select 1. Customer Enquiry or click the Customer Enquiry icon.
The Customer Enquiry window is displayed.
Customer Enquiry Window Overview
| Option | Description |
| a. From Customer & To Customer | Enter a specific customer's code, surname, or a enter a range. |
| b. State | Select a state from the dropdown or leave the default of Select to display customers in all states. |
| c. Suburb | Enter the first few letters of a suburb to filter all customers with the text matching the beginning of their suburb. E.g. entering ‘Fair’ will return customers in ‘Fairfield’, ‘Fairbourne’ etc. To ensure the Suburb is an exact match after entering the first few letters, click Find next to the suburb field to select the correct suburb. |
| d. Postcode | Enter a postcode to return all customers with that postcode. Partial postcodes such as ‘39’ will return all customers with postcodes beginning with ‘39’. |
| e. Customer Type | Filter by customer type e.g. All, Customer, Doctor, Deceased etc. |
| f. Facility | Filter customers by Facility type such as a nursing homes, hospitals or third parties, or enter the name, ID or code of a particular facility to view a list of customers assigned to that facility. |
| g. Prescriber | Enter a Prescriber name, ID or code. If multiple prescribers match the entered name, a Prescriber Search window will allow you to select the correct prescriber. |
| h. Club | Filter customers by Club. |
| i. Current Status | Filter customers by entitlement status, displaying all customers with a particular status e.g. concessional or repat. |
| j. Type | If a status of R. Repatriation is selected, you can then filter further by selecting the repat type i.e. white, gold or orange. |
| k. Co-Pay Status | Filter customers by a selected Co-Pay Status. |
| l. Display email | Display the customer’s personal or account email. Selecting this option will update the email address that is displayed in the list of results. |
| m. Account Status | Displays the customer’s Account Status
|
| n. 1. Account | Display all customers with an account. |
| o. 2. Email Statement | Display customers who have their statements emailed to them. This filter can only be applied, when 1. Account is checked. |
| p. 3. Linked to Account | Display customers who are linked to a master account. This master account number is then displayed in the Linked To column within the refined list. |
| q. 4. Scripts on File | Display customers who keep their scripts on file. |
| r. 5. CTG | Display all Closing the Gap customers. |
| s. 6. IHI | Display customers with an Individual Health Identifier. |
| t. 7. UCI | Display customers with a Unique Customer Identifier. |
| u. 8. Customer Notes | Display customers with customer notes. |
| v. 9. Additional A/C Charges | Display customers configured for additional account charges. |
| w. 0. Print Statement | Filter by customers that have the Print Statement checkbox checked in their customer profile. This filter can only be applied, when 1. Accountis checked. Note: This filter is not available to CCA pharmacies. |
| x. Next and Prev | Navigate through the pages of displayed customers. |
| y. Change | Open the Customer Editing window for the highlighted customer. Double clicking a customer will also display the Customer Editing window. |
| z. Find | Search within the current list of customers for a particular customer using their surname or customer number. |
| 1. Merge | Merge duplicated customer records. |
| 2. Interim Statement | Allows you to view and/or print an interim statement for the selected customer. Note: For CCA pharmacies, Interim Statement is only available when the 3. Linked to Account checkbox is checked. |
| 3. Re-print Statement | Allows you to re-print the current statement for the selected customer or all displayed customers. This option is available when you have checked the 1. Account checkbox. Note: This option is not available to CCA pharmacies. |
| 4. Email Statement | Allows you to Email the current statement for the selected customer or all displayed customers. This option is available when you have checked the 2. Email Statement checkbox. Note: This option is not available to CCA pharmacies. |
| 5. Print | Generate and print the Customer Enquiry Report. This can be then be exported, refer to Export a report for more information. |
