Centralised Customer Accounts can be created using import files. This process can be conducted during the initial CCA migration or at any other time and is especially useful when migrating to Minfos from other systems.
The import tool can only be run at Head Office. The import file must specify a Master store for each account and the Head Office cannot be set as the Master store. When importing at Head Office, opening balances for accounts cannot be included. The import tool can also be run at a store. When importing at a store, opening balances can be included.
Note: To run a CCA import at a store, please contact Minfos Support. To have this option available you must have CCA enabled.
Preparing the Import File
The import tool requires a tab delimited txt file. The file can be created manually or by exporting records from other systems.
Warning: If editing the file in Excel, leading zeroes may be truncated.
The import file must contain the following fields:
- Master Store i.e., the Multi-store business code for the pharmacy
- Surname
Minfos recommend the Master Store and Surname fields are the first fields in the import file. All other fields are optional and can be in any order. Ensure the order of the file is matched in the Import tool.
Importing the Accounts
From the Minfos Launch Pad:
1. Click the Special menu and select Utilities.
The Utilities module is displayed.
2. Click the Special menu and select E. Import Centralised Customer Accounts.
The Import New Centralised Customer Accounts window is displayed.
Note: Master Store and Surname are pre-populated in the File Format section. Ensure your import file has these two fields first.
3. Click Browse to select the import file. Navigate to the correct file and click Open.
4. From the Import Fields section, highlight the fields that exist in your import file and click Add to move them to the File Format section.
- Highlight a field in the File Format section and click Up or Down to adjust the order to match your import file, if required
- Highlight a field in the File Format section and click Remove to remove it from the File Format section, if required
- The Ignore field can be added to File Format in any position and can be used to ignore specific fields in the import file. It can be added as many times as required
5. Once the fields in the File Format box match the fields in the import file, click OK to import the file.
6. The file is validated (click here for more information on the validation process) and imported, and the Import Centralised Customer Accounts Result Report is displayed.
7. The Import Centralised Customer Accounts Result Report should be exported to excel/pdf so each exception can be actioned manually:
- If a major exception was found, Account Number will be listed as Failed and the reason listed on the report. If an account is listed as Failed, it has not been created
- For minor exceptions e.g. missing email address, the exception will be listed with the account number. The account will still be created but should be reviewed once the import has finished
- The report will list a summary at the bottom detailing:
- How many accounts were created
- How many were created with exceptions
- How many failed and were not created
Example Report: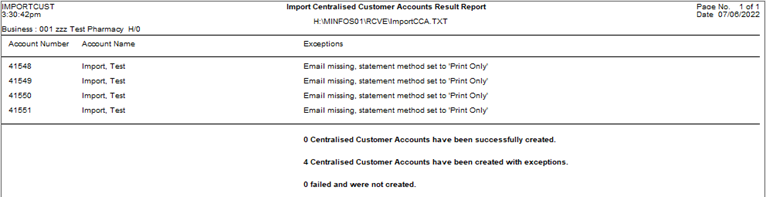
File Validation
Most fields will be validated in the same way as when an account is added manually, however there are some additional criteria:
- Postal Address: should be set as Y or N
- Statement Method: this field varies from manually adding an account and should be included in the import file as a number as opposed to the option text:
- 0 = None: no statement will print or be emailed
- 1 = Both: a statement will be printed and emailed; a valid email must also be provided in the import file or the option will be set to None automatically
- 2 = Print Only: a statement will be printed
- 3 = Email: a statement will be emailed; a valid email must also be provided in the import file or the option will be set to None automatically
- Direct Debit: should be set as Y or N; if set to Y in the import file then, valid bank details must be provided. If any of the details provided are invalid, Direct Debit will not be enabled for the account
- Hyphens will be removed from the BSB and Account number
- If either the BSB (6) or Account Number (9) lengths are exceeded, the field will be rejected
- If either BSB or Account number are missing, Direct Debit will not be enabled
- If Direct Debit is set to 'N' but details are provided, the details will still be saved (providing they are valid). Direct Debit will then need enabled manually in the Customer Account Entry window
Note:
There is no import option for:
Charge Interest on Overdue Accounts
ABN
Till Notes
These must be set manually in the Customer Account Entry window, if required.